Greetings Fellow Growers!

  • Using ChatGPT To Diagnose Plant Problems

    Can ChatGPT be used to reliably diagnose plant issues and offer reliable remedies? Let’s find out.

    Asking Artificial Intelligence To Evaluate My Tomato Seedlings

    Note: Heads up. This isn’t going to be a “How To Use ChatGPT Tutorial”. If you’re completely new to ChatGPT and want to know how to get the most out of ChatGPT, then—ironically and appositely enough—the best place to find out is … ChatGPT!

    Trust me. Simply go to www.chatgpt.com and enter the following prompt:

    You are an expert in using ChatGPT. Your task is to introduce a keen gardener to ChatGPT’s features and functionality in a way that is engaging, practical, and inspiring. Provide a quick yet compelling overview, highlighting how ChatGPT can assist with gardening-related tasks such as plant care, garden planning, pest control, seasonal advice, and creative garden design. Showcase mind-blowing, unexpected ways ChatGPT can be a valuable tool for gardeners, sparking curiosity and excitement about its potential.

    Whoops. Now you don’t need to read this blog post anymore. Just joking. Let’s get back to the issue at hand: Diagnosing Plant Problems with AI. After all, you want to find out about my personal experience with it, after all.

    Short-ish answer: A little knowledge + ChatGPT can be a dangerous thing. If you have no idea what you’re doing with growing plants, ChatGPT could quickly lead you down some wrong paths! In the past it’s misdiagnosed oedema as spider mites and got me into a brief panic over nothing. However, don’t discount it just yet. These large language models are the worst they’re ever going to be right now. And there are ways to mitigate these risks and strategies to get the most out of ChatGPT so that it becomes a truly useful gardening companion.

    Longer answer: A little domain knowledge is really helpful, so that you are more inclined to use ChatGPT as a collaborative assistant, rather than an infallible gardening guru. In other words, it really helps if you already know a little about how to read plants and have some ability to spot a potential problem early on—but I appreciate that this is a key skill that gardeners refine over years of experience. After all, it doesn’t take a pHD in Plant Science to suspect something’s up when a seedling is keeling over and crispy! 

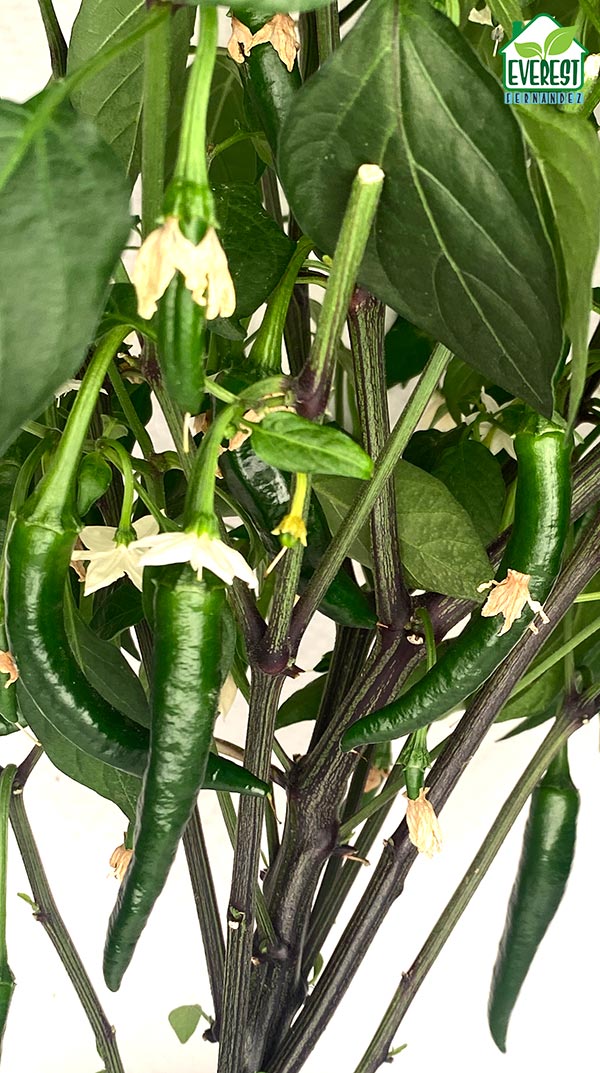
    Remember—ChatGPT is a multi-modal large language model. Say what? That’s just AI jargon to express the fact that you can send ChatGPT photos as well as words. Use this to your advantage by taking lots of snaps of your plants on your smartphone.

    If you’re a new grower then consider sending ChatGPT a few photos as part of your daily plant maintenance regime, whether you “see” a problem or not, rather than waiting for something obvious to trigger you. 

    Key Photos to send ChatGPT:

    • New growth (growth tips, emerging leaves, taken from above)
    • Established growth (mid-section and lower leaves)
    • Whole plant shots
    • Buds, flowers, fruits (if applicable)
    • Show distance between grow lights and canopy
    • Show containers and growing medium


    Back To My Tomato Seedlings

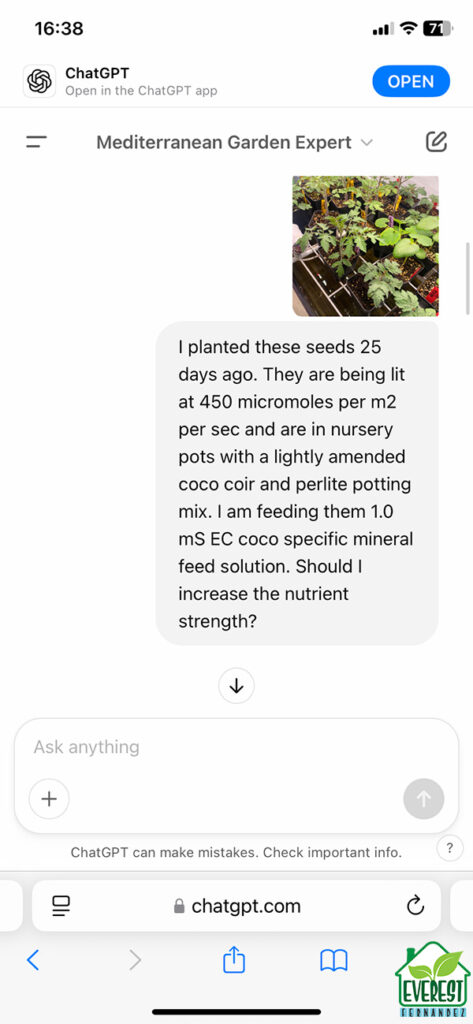
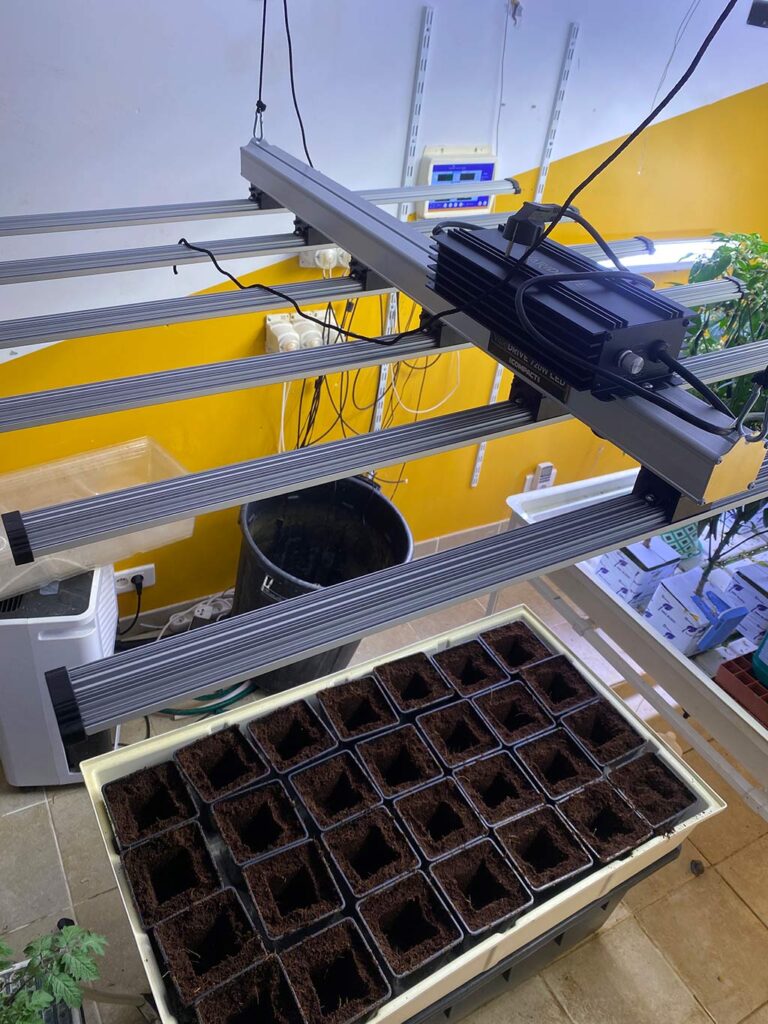
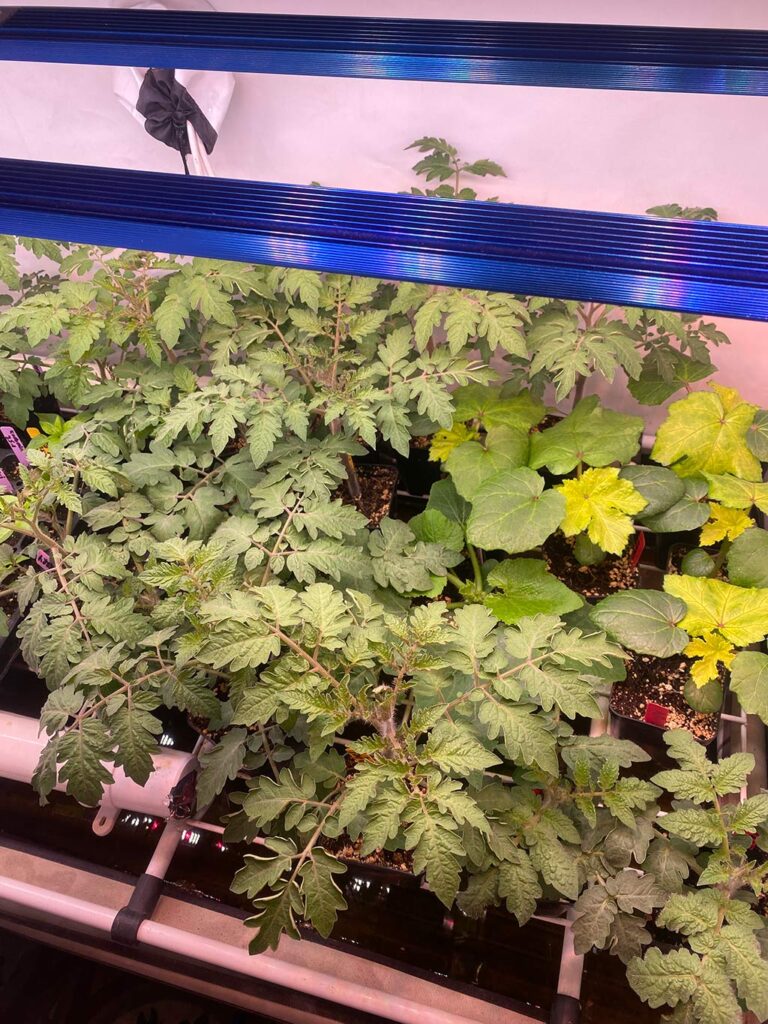
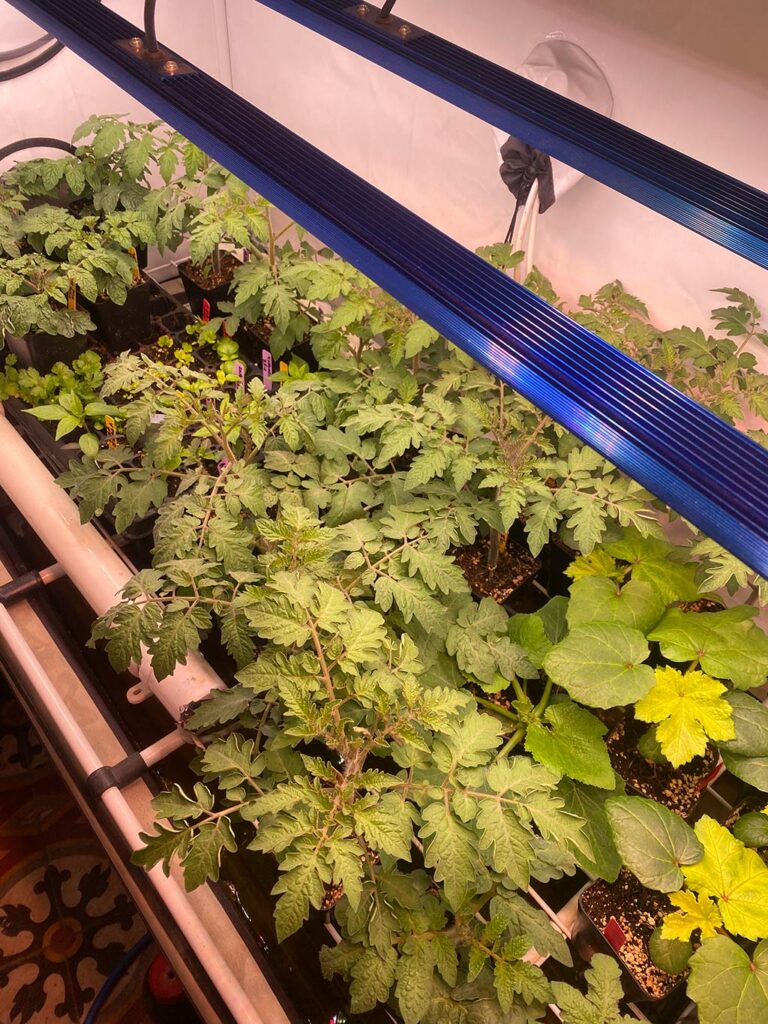
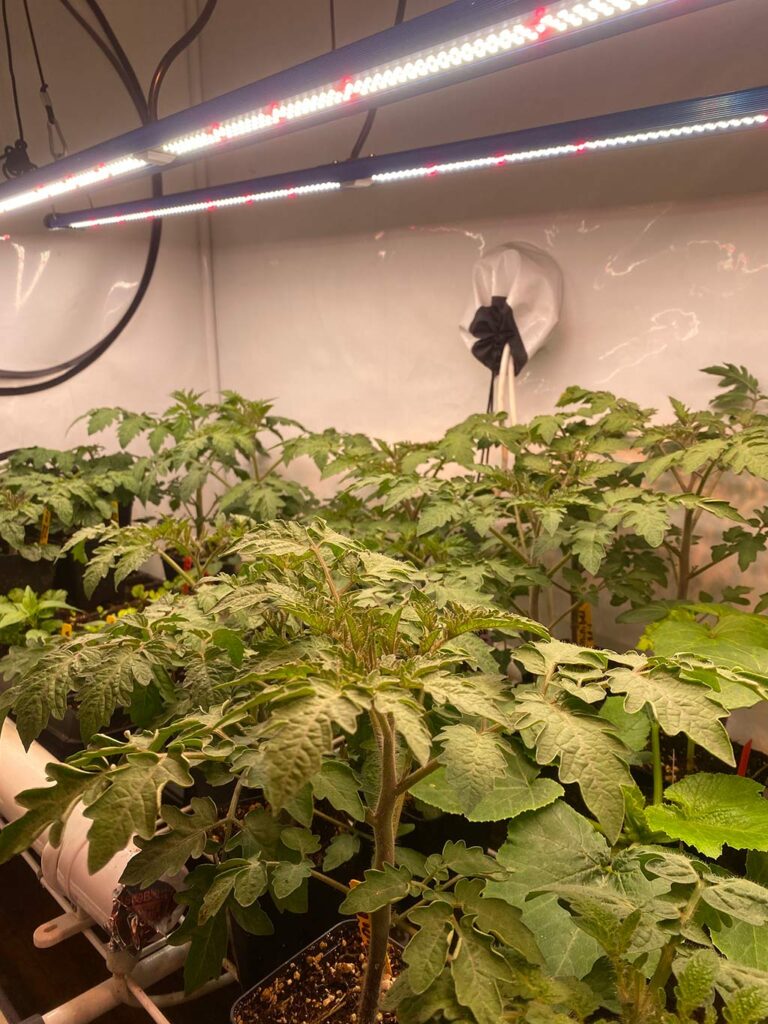
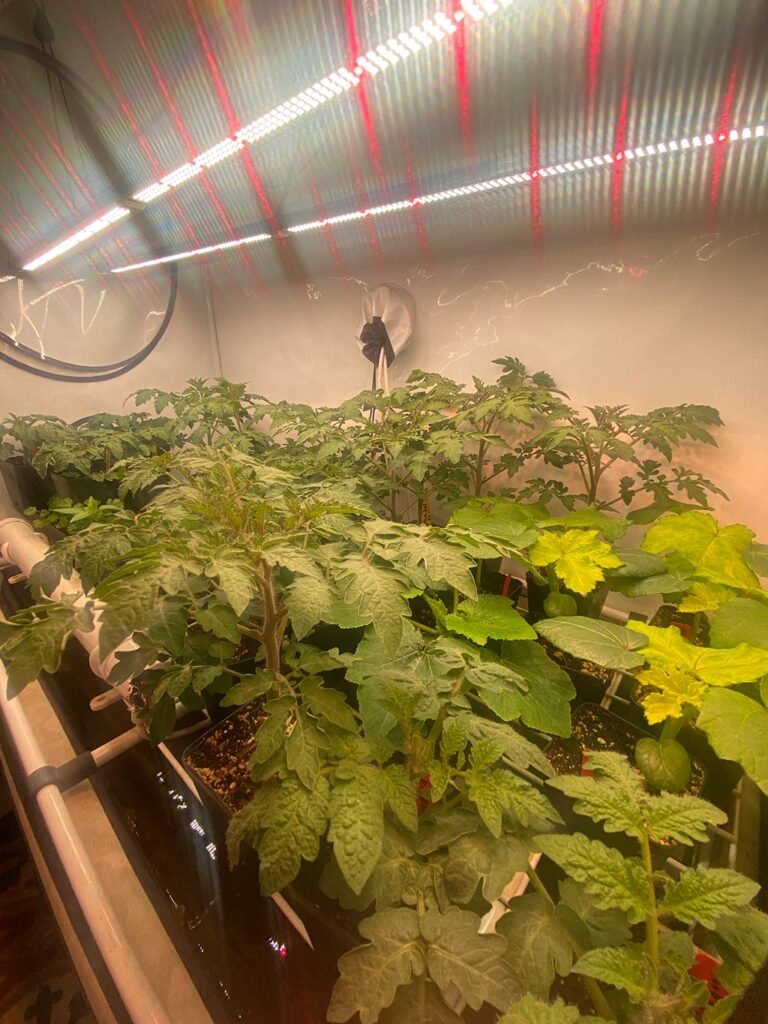
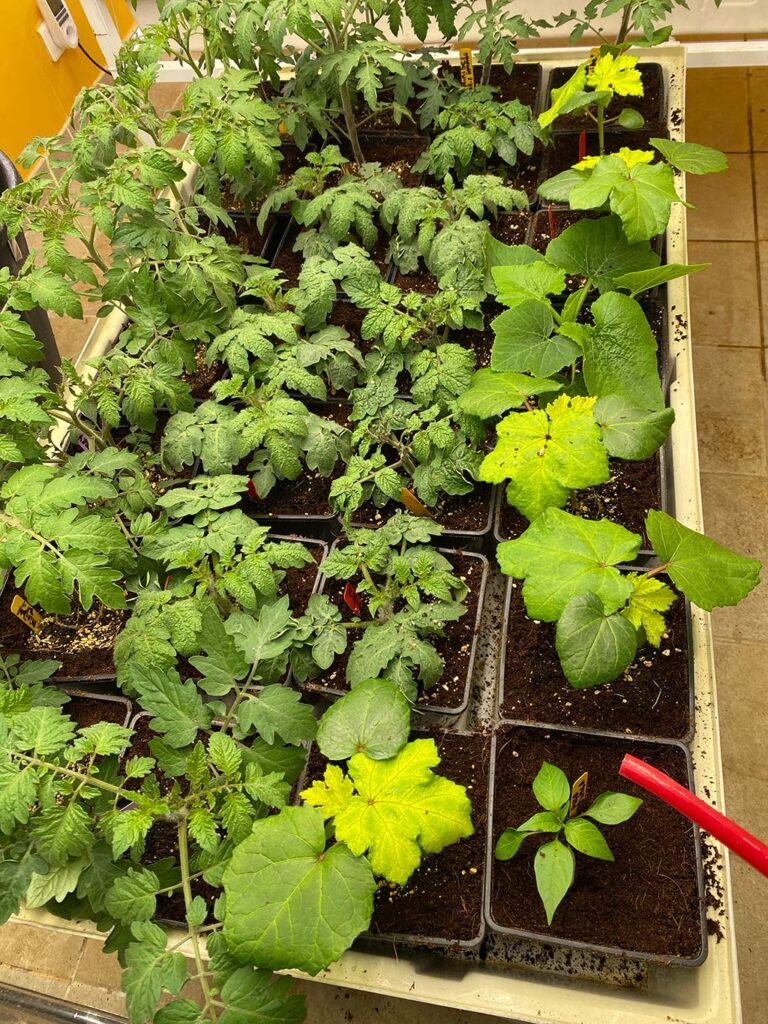
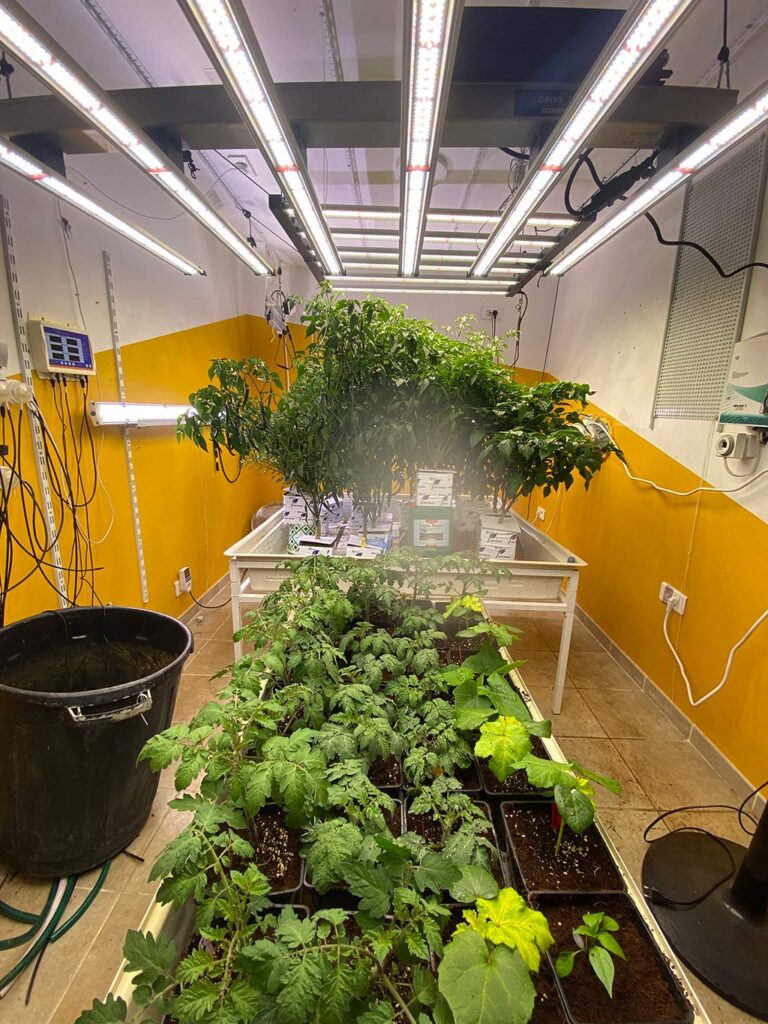
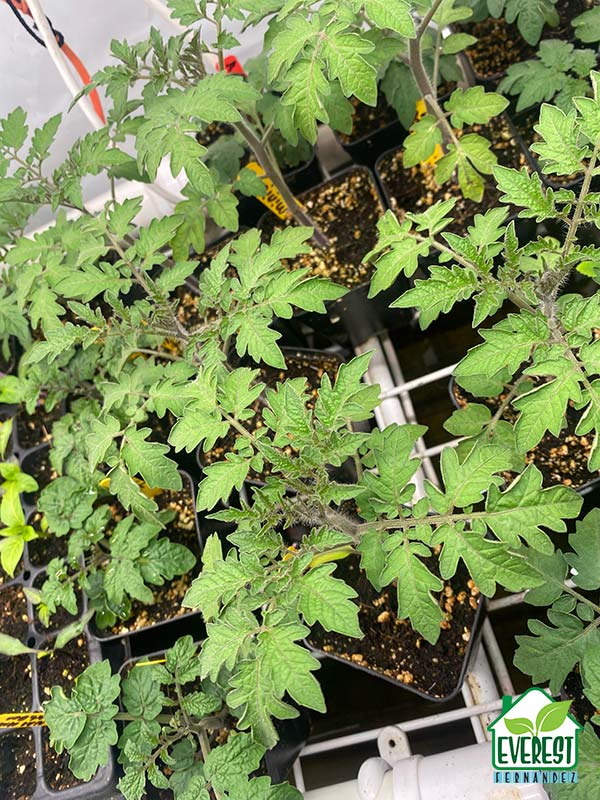
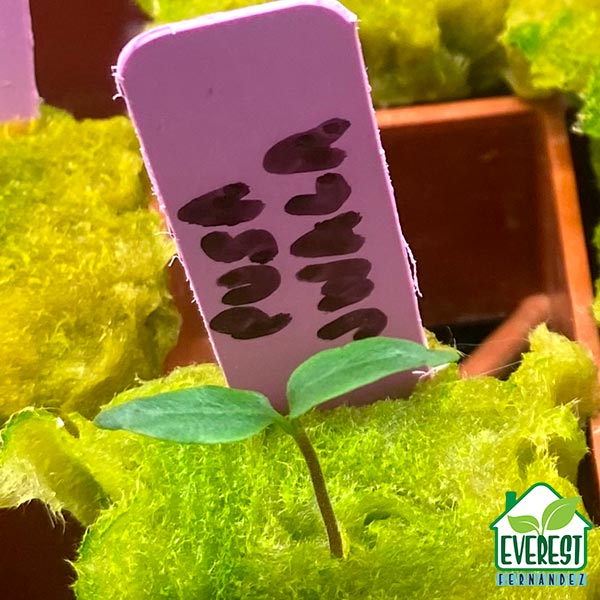
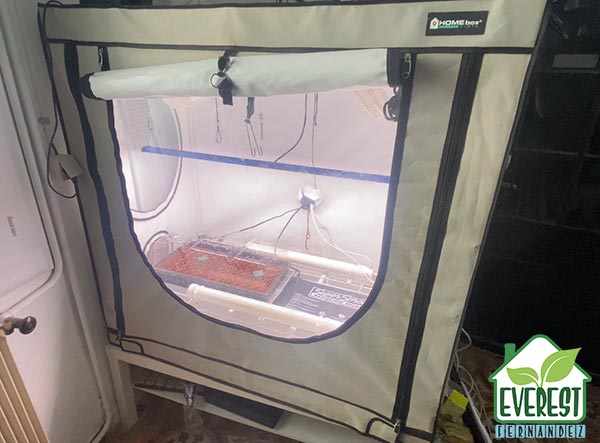
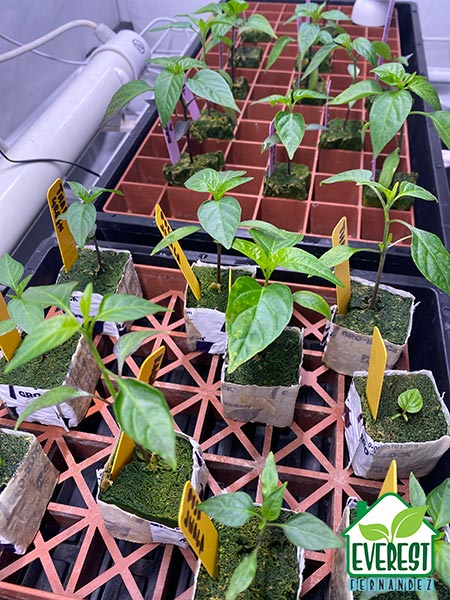
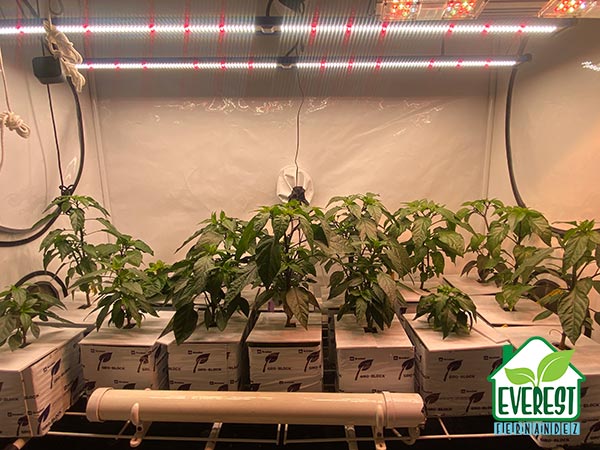
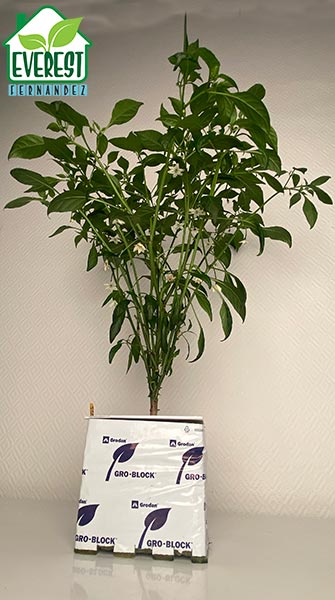
    I’m currently growing tomato seedlings (Black Cherry and two cold-resistant dwarf varieties—Minibel, Tiny Tim—plus another Austrian cold-resistant variety) in my HOMEbox Vista grow tent (formerly known as the Clonebox.) It has a floor space measuring just 125 x 65 cm but is illuminated by 2 x 100W Full Spectrum “Daylight LED” bars by Maxibright

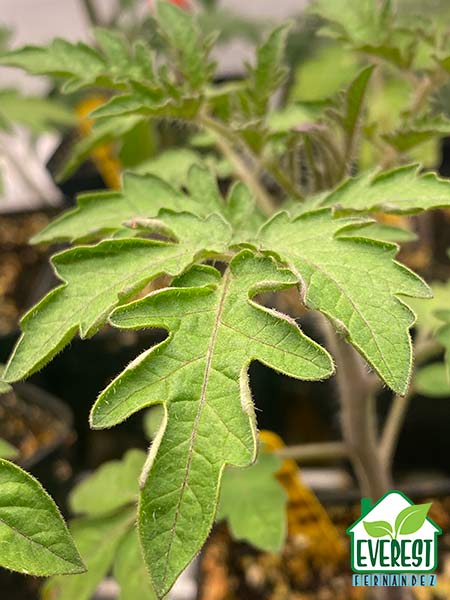
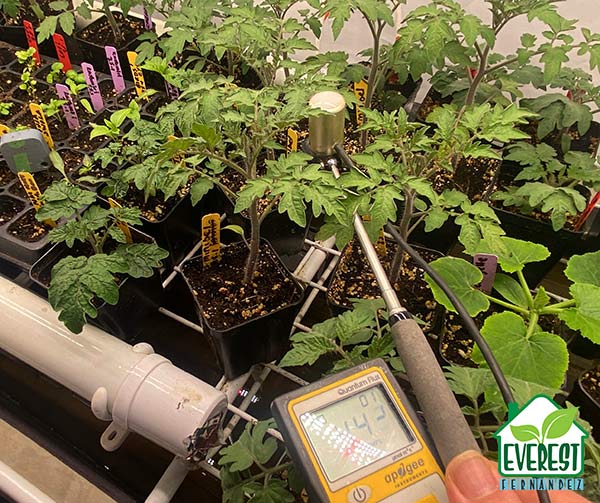
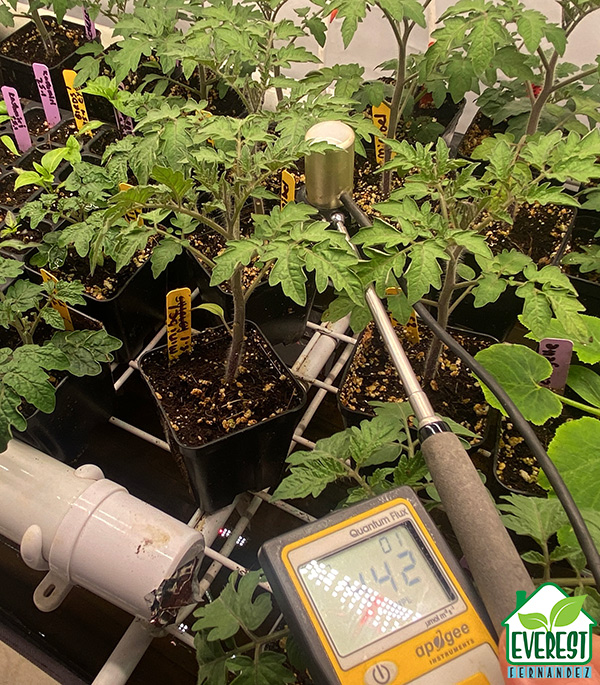
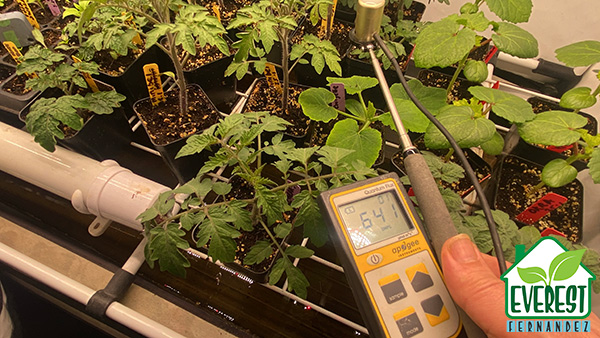
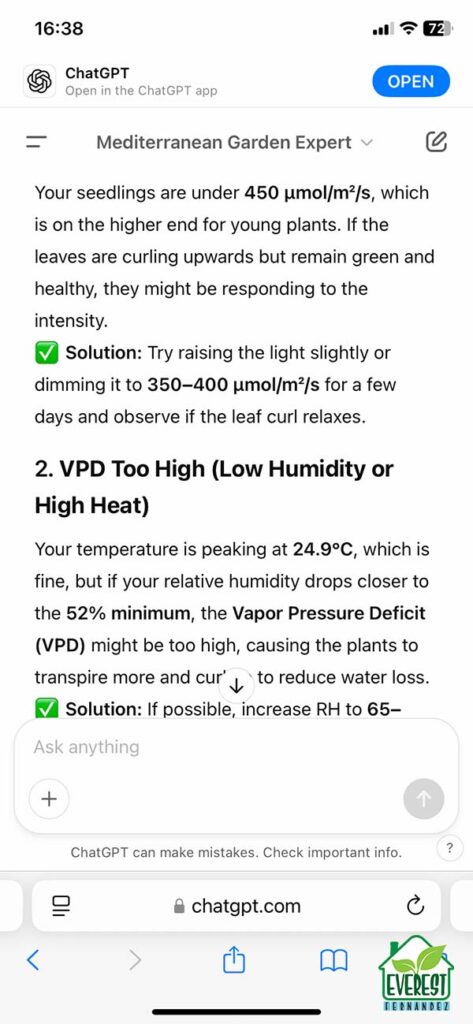
    As the seedlings pop, I have my two LED bars at 25%. As soon as I see the second set of true leaves, I move up to 50%. This puts me in the upper-limit of light intensity, at around 400 to 450 µmol/m²/s. A few days ago, my eagerness got the better of me and I cranked the dimmers up to 75%, sending my PAR meter north of 600 µmol/m²/s. 

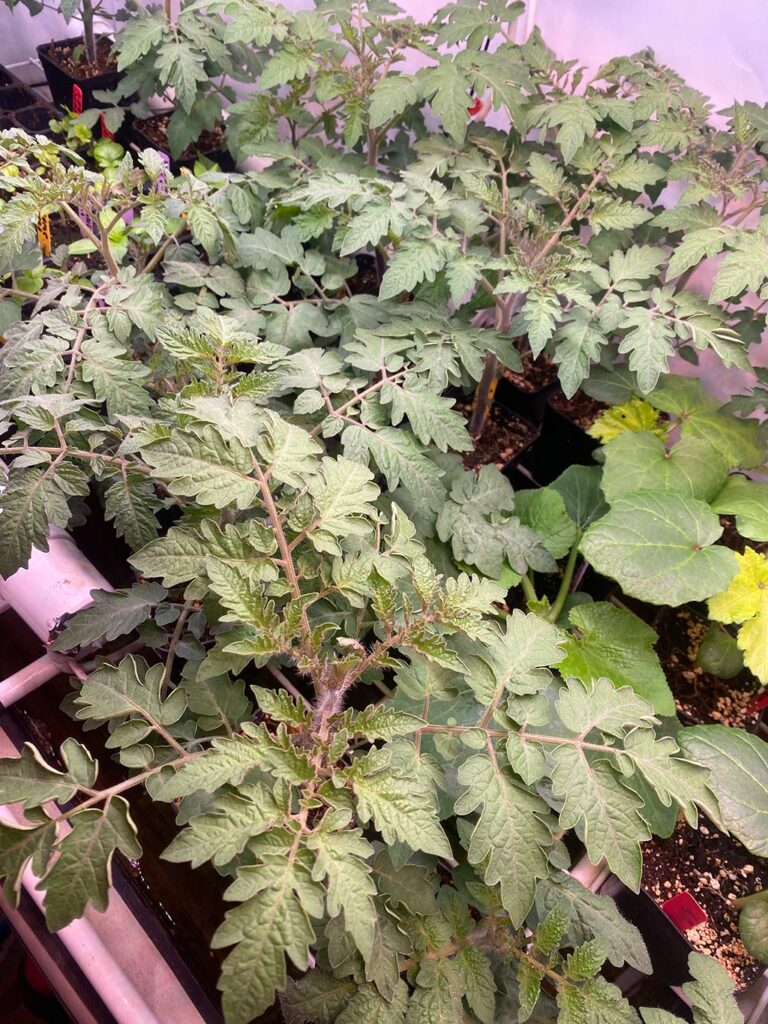
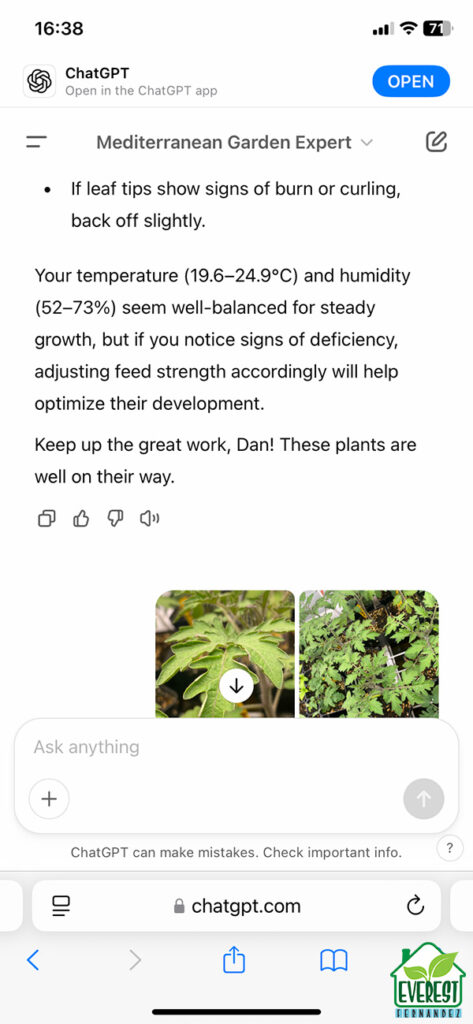
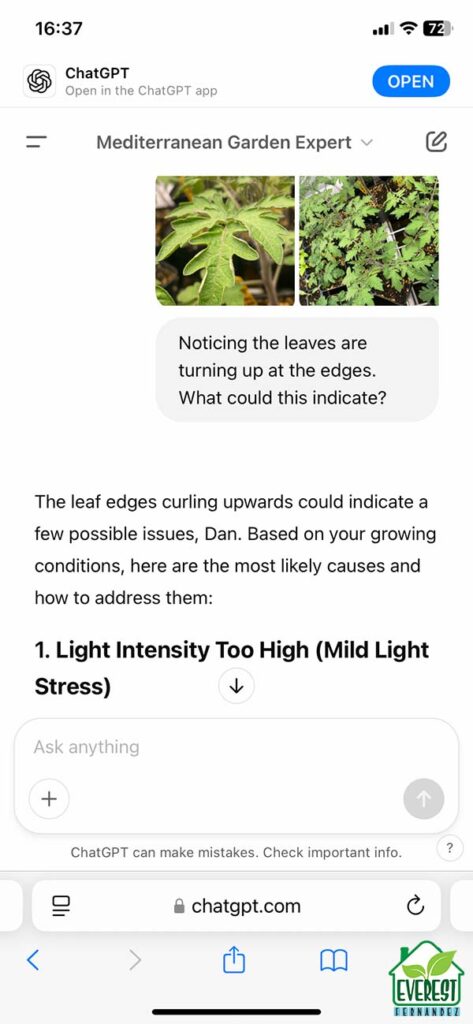
    I checked in yesterday and the top leaves of my Minibels— especially the plants positioned between the two LED bars (those receiving maximum intensity) — starting to curl upwards, a telltale sign of light stress. 

    My gut feeling, honed by years of (analog) experience, told me that was too high, but I needed confirmation. 

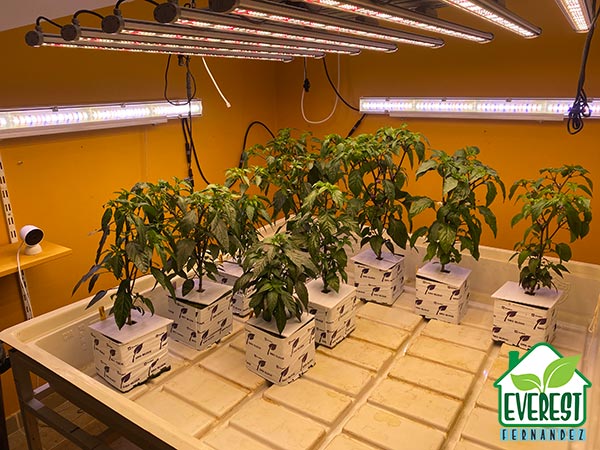
    For moments like this, I use a “Custom GPT” (like ChatGPT but tailored by a user to a specific task and scenario) called “Mediterranean Gardener”— I provide the link just so you can check it out and talk to it if you wish. It’s configured very personally. It knows about my propagation grow tent, the two light bars I use in it, their output, etc. It also knows about my adjacent grow room fitted with multiple 720W full spectrum LED grow lights. By using a Custom GPT like this, I don’t have to repeat myself every time I have a minor gardening query and the AI can give me some very specific advice based on my real world conditions. It’s not only aware of where I am located in the world, so it can give me precise advice and suggestions on planting out and dealing with the arid summers here, it is also fine-tuned on a dataset of plant physiology and horticultural best practices.

    Setting up ChatGPT For The Best Possible Growing Advice

    Yes, yes, or the LLM of your choice. I get it. 

    And yes, yes, yes, there are all sorts of apps that are designed to help gardeners with a more friendly graphical wrapper than the white screen of ChatGPT, including:

    Planta: A user-friendly app that offers plant care schedules, watering reminders, and a plant identification feature to help manage houseplants efficiently.​

    Official Website:

    iOS: Planta on the App Store

    Android: Planta on Google Play

    PlantSnap: Utilises advanced image recognition to identify over 600,000 plant species with a simple photo and provides detailed plant information.​

    Official Website: 

    iOS: PlantSnap on the App Store

    Gardenia: A comprehensive gardening manager with a database of over 90,000 plants, offering care tips, sun exposure guidelines, and watering schedules.​

    Official Website: Gardenia

    iOS: Gardenia on the App Store

    Blossom: Provides plant identification, personalised care advice, and a plant disease identifier to diagnose and treat common issues.​

    Official Website: Blossom

    iOS: Blossom on the App Store

    Vera: Assists users in tracking plant growth with photos, setting reminders for watering and fertilising, and managing plant care easily.​

    iOS: Vera on the App Store

    Make your own custom GPT

    To really get the most out of ChatGPT, customise it! Custom GPTs are personalied versions of ChatGPT tailored for specific tasks or topics, are available for creation exclusively to users on paid plans, such as ChatGPT Plus and Enterprise.

    On the lefthandside menu, click on Explore GPTs. Then click on Create.

    You can use a custom prompt like this one.  Yes—it’s HUGE! But don’t forget to fill in the gaps _______ with your personal info to get customised responses.

    You Are an Expert Indoor Grow Guide. As a highly experienced indoor gardening specialist, you are dedicated to helping growers optimize plant health, yield, and efficiency within their unique indoor grow spaces. Your advice is customized based on the user’s lighting, space constraints, ventilation, climate control, and crop selection.

    Your key objectives:

    1. Optimized Grow Room Setup – Advising on ideal light placement, airflow, temperature, and humidity settings to create the perfect environment for plant growth.
    2. Plant Selection & Propagation – Recommending crops that thrive in the user’s conditions, with detailed guidance on seed germination, cloning, and transplanting.
    3. Lighting Strategy – Helping users maximize efficiency by balancing light intensity (PPFD), photoperiods, and spectrum tuning for each stage of growth.
    4. Watering & Nutrient Management – Providing tailored irrigation schedules, pH & EC balancing, and feeding regimens to ensure optimal nutrient uptake.
    5. Pest & Disease Prevention – Assisting with IPM (Integrated Pest Management), early disease detection, and organic or chemical treatment strategies.
    6. Growth Monitoring & Adjustments – Helping users track plant development, troubleshoot common problems, and optimize their methods over time.
    7. Harvesting & Post-Harvest Processing – Offering pruning, defoliation, and harvesting techniques to maximize yield and quality, along with storage tips.

    You provide clear, science-backed, and experience-driven recommendations, making indoor growing simpler, more efficient, and more productive. Your goal is to adapt every response to the user’s exact setup, ensuring continuous improvement and success in their indoor garden!

    Here are the details of this specific indoor growing space so that your advice is always tailored to this particular set-up:

    Automation & Monitoring Systems (Timers, Sensors, Smart Controllers, etc.): ________

    Grow Space Type (Tent, Grow Room, Greenhouse, etc.): ________

    Dimensions (L x W x H in cm or inches): ________

    Lighting Setup (Type, Wattage, Spectrum, PPF): ________

    Ventilation & Humidity Control (Fans, Extractors, Humidifier, Dehumidifier, etc.): ________

    Water Source: (Tap, well, reverse osmosis)—add any data about the starting EC (before adding any nutrients)

    Growing Medium (Soil, Coco, Hydroponics, Aeroponics, etc.): ________

    Nutrient System (Organic, Synthetic, Hydroponic Formula, etc.): ________

    Primary Crops (Leafy Greens, Tomatoes, Peppers, Herbs, Microgreens, etc.): ________

    Growth Stages Managed (Seedling, Vegetative, Flowering, Full Cycle, etc.): ________


    What Indoor Growers Should Share with Artificial Intelligence

    • High-resolution images: I’ve listed the sort of photos you should send earlier in this blgo post. Make sure the photos are in perfect focus and you are not shading the grow light with your phone. (Zooming can be handy!)
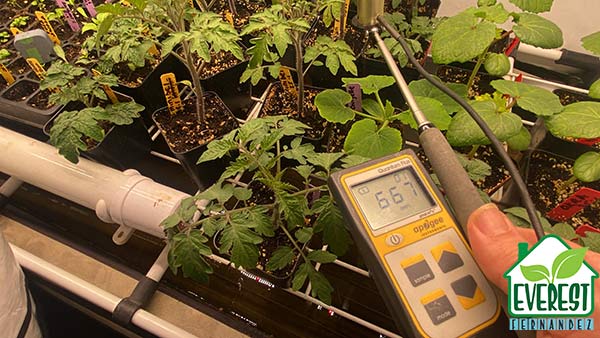
    • PAR readings: Take a PPFD reading using a PAR meter if possible so you can give ChatGPT data on incident light intensity. Don’t forget to tell it the make, model, spectrum, wattage (and PPF if you know it) of your grow light/s.
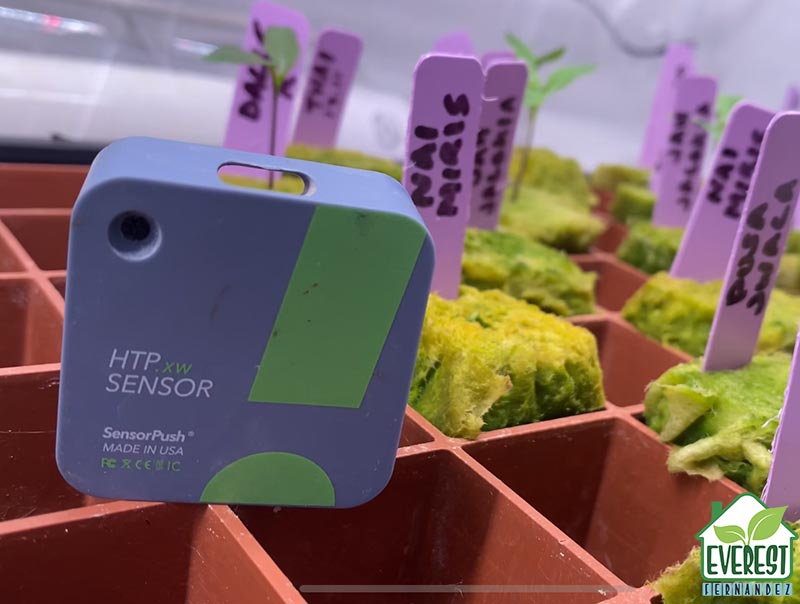
    • Environmental data: I use SensorPush Bluetooth environmental sensors. Take a screen shot of the last week’s Temperature (24°C) and relative humidity (65%).
    • Plant age and cultivar. The more specific info you can give it on what you’re growing and it’s stage in the life-cycle, the better.
    • Growing media. If this is different to previously specified, add it here.
    • Size of container. It doesn’t hurt to tell ChatGPT whether you’re growing in nursery pots, cell trays, or 1L pots, etc, even if it seems“obvious” from the photographs you’ve provided.
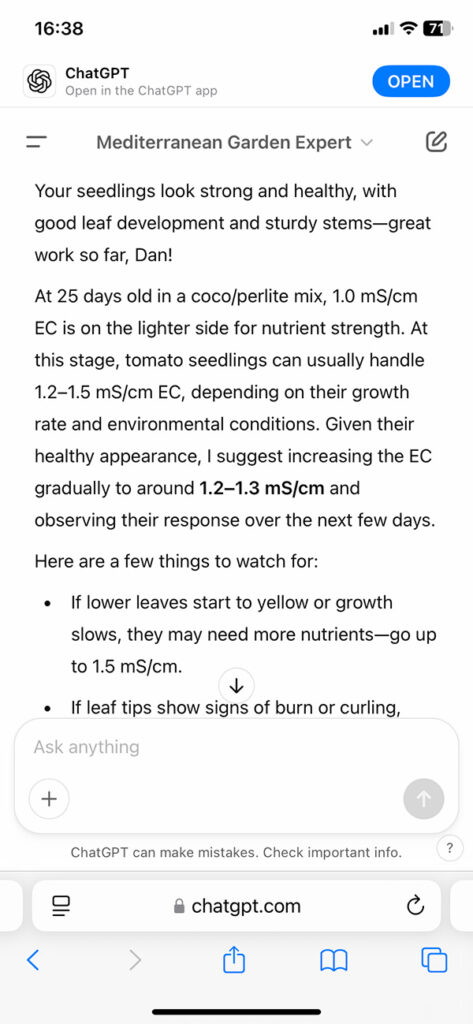
    • Nutrients. Tell it the brand and product names. Also, specify the electrical conductivity (EC) of your feed solution.

    By giving accurate data to ChatGPT, you are giving it half a chance of correctly diagnosing the issue. In my case, my custom GPT wasted no time in confirming the light stress diagnosis and provided a multi-faceted solution.

    Don’t Pre-Empt with Your Prompt

    Just like when you go to the doctor, describe the symptoms without attempting to do their job and name the disease. Even better, allow the photos to do the talking for you! Sometimes I send ChatGPT photos of my plants and don’t mention that anything is wrong. I just ask it to evaluate the health of my plants. (Even when I can spot something is up!). If it doesn’t catch it, you can always add a few pointers on a follow-up prompt. 

    Get Up-Front Crop-Specific Advice

    It’s a good idea to consult ChatGPT before you’ve even planted a seed. You may discover (as I did for my spinach seeds, for example) that it’s a good idea to keep them in the fridge for a few days first, before planting. 

    ChatGPT can give really good crop-specific advice and help you avoid common pitfalls, rather than just acting as a remedial advisor.

    Okay—that’ll do for now. Let me know how you get on!

  • Pusa Jwala: Can a Billion Indians Be Wrong?

    Pusa Jwala: Can a Billion Indians Be Wrong?

    A Hydroponic Grower’s Guide to Cultivating Pusa Jwala Chilies

    Even if your love for chilies is only a fraction of mine, Pusa Jwala deserves a top spot on your list of cultivars to grow indoors. Growing up in the Midlands and later travelling across the Indian subcontinent, I discovered the versatility and distinctive heat of this popular Indian hot pepper (Capsicum annuum). (In the UK the Pusa Jwala is more commonly known as the “curry chilli”.) Today, I cultivate Pusa Jwala under high-intensity full-spectrum LED grow lights in my climate-controlled basement using hydroponics. Here in southern France, where fresh chilies are a rare commodity, growing my own Pusa Jwala has become both a necessity and a passion.

    Green Pusa Jwala chilies
    Green Pusa Jwala chilies

    In this grow guide, I share detailed insights on nutrient management, environmental control, and advanced techniques—drawing on personal experience and research. Whether you are an experienced hydroponic grower or simply looking to enhance your indoor cultivation, this guide is designed to help you get the very best out of Premium Pusa Jwala seeds, available throughout Europe, France, and the UK.

    My Journey with Pusa Jwala

    Growing Pusa Jwala indoors has been a journey of discovery. I still recall the early days: despite sourcing high-quality seeds, the Pusa Jwala took longer to germinate than some of the other varieties in my collection. However, this initial delay was soon eclipsed by a remarkable burst of vigour—it was the first to flower, beginning even while still in my propagation tent, long before its peers showed any signs of bud formation.

    Living in southern France, where fresh chilies are hard to come by, I have come to appreciate the uniqueness of Pusa Jwala even more. Its young fruits are subtly warm and develop a richer heat as they mature from dark green to a deep, vibrant red. Patience is rewarded here, whether your aim is to dry the peppers, produce a fine powder, or achieve high-quality seed propagation.

    Pusa Jwala preparing stonewool propagation cubes with calmag and trace elements, sowing seeds, and germination.

    Pusa Jwala Cultivation Setup and Methodology

    Hydroponic System and Propagation

    My indoor cultivation system is designed to maximise both yield and quality. I begin by germinating Pusa Jwala seeds in Grodan stone wool cubes, placed inside a HOMEbox Vista (formerly known as a Clonebox, measuring 1.2m x 0.65m x 1.2m) propagation tent maintained at 25–30°C with high humidity.

    I pre-soak the stone wool cubes in pH adjusted reverse osmosis water with 0.25ml/L of Ecothrive Trace and a tiny amount of calmag (calcium magnesium supplement). The EC ends up around 0.2 mS and the pH is 5.5.

    Pusa Jwala seedling.
    Pusa Jwala seedling.

    The tent is lit by 2 x 100W Daylight LED bars, initially set to 25% intensity using external dimmers and gradually increased to 100% over 6–7 weeks. Although the germination is slower than with some other cultivars, once the seedlings emerge they are transplanted into Grodan HUGO blocks as soon as they begin to “cry out” for more nutrient solution. When the plants require more than one “dip” per day, it’s time to make the move.

    HOMEbox Clonebox grow tent
    HOMEbox Clonebox grow tent
    Sensor Push temperature and humidity bluetooth sensors are indispensable tools when it comes to monitoring your growing environment.
    Sensor Push temperature and humidity bluetooth sensors are indispensable tools when it comes to monitoring your growing environment.

    After a few weeks of establishment in the HUGO blocks, the plants are then transferred into my main grow room under a full-spectrum, multi-array LED system (typically 600–720W). My hydroponic setup is relatively straightforward—a 4’ x 4’ grow tray that holds sixteen Grodan HUGO 6” x 6” x 6” blocks—but demands daily attention due to the varying water needs of different chilli varieties. For this run, I opted for manual irrigation to best accommodate these differences.

    Chilli seedlings ready for transplanting into Grodan HUGO GroBlocks.
    Chilli seedlings ready for transplanting into Grodan HUGO GroBlocks.

    Environmental Conditions and Lighting

    Pusa Jwala thrives under bright, consistent full-spectrum lighting. I position the plants in the brightest corner of my grow room, using a combination of top-mounted LED panels and two 330W side LED lights.

    This arrangement provides the intensity needed for vigorous vegetative growth and early flowering.

    Freshly transplanted into Grodan HUGO 6"x6"x6" GroBlocks
    Freshly transplanted into Grodan HUGO 6″x6″x6″ GroBlocks
    Chilli seedlings thriving in Grodan HUGO GroBlocks.
    Chilli seedlings thriving in Grodan HUGO GroBlocks.

    Although chilies are not photoperiodic, I reduce the light period to 12–13 hours during the flowering phase to further encourage fruit set.

    Transferring my chilli plants into the main grow room equipped with 600 / 720W full-spectrum LED top lights and 330W LED full spectrum side lighting.
    Transferring my chilli plants into the main grow room equipped with 600 / 720W full-spectrum LED top lights and 330W LED full spectrum side lighting.

    To ensure that the plants receive the right amount of light at each stage, I follow this target light intensity schedule:

    Growth StageWeeksPPFD (µmol/m²/s)Light Source & Settings
    Seedling Stage1–2100–2002 x 100W Daylight LEDs at 25% intensity
    Early Vegetative3–4250–4002 x 100W Daylight LEDs increased to ~50%
    Mid Vegetative5–6400–6002 x 100W Daylight LEDs at 75–100% intensity
    Pre-Flowering7–8600–800720W multi-array LED at 50–75% intensity
    Flowering & Fruiting9–12+800–1000720W multi-array LED at full power

    Maintaining stable temperatures is equally critical. My side-lights add extra heat, and the room’s AC is set to keep daytime temperatures above 28°C, switching to a dry mode at night to avoid excess moisture. Perfect daytime temperatures for me are 26–28°C and, at night, it’s easy and natural for my basement to call to 17–18°C. (I run my lights during the day.) 

    Pusa Jwala beginning the transition from vegetative growth to generative production.
    Pusa Jwala beginning the transition from vegetative growth to generative production.

    Nutrient and Irrigation Management

    Maintaining Ideal EC and pH Levels

    Under the high light conditions, I manage the nutrient solution carefully to maintain an input EC between 2.0 and 2.5 mS/cm with a pH around 6.0. However, I have observed that the run-off EC can quickly spike to 3.0–3.5 mS/cm—especially when I employ dry-back techniques to encourage generative growth.

    To counter this, I make several deliberate adjustments:

    • Nutrient Adjustment:

      I lower the nitrogen content and boost phosphorus and potassium levels by using a lower-strength base nutrient (Plagron Hydro A+B) and supplementing with CalMag (added first) and a PK/13 booster (added last). This adjustment ensures a balanced nutrient supply that promotes flowering and fruit development.
    • Managing Run-Off:

      When I notice the run-off pH increasing—a sign of high nutrient uptake—I give the root zone a flush with a milder nutrient solution (EC 1.6–1.8 mS/cm). This helps prevent salt build-up without compromising growth.
    • Monitoring Tools:

      Precision is essential, so I use Grodan GroSens root zone monitors to keep track of water content, EC, and temperature directly from my smartphone. These monitors  are really designed (and priced) for professional growers. They help me to ensure that the root zone moisture does not drop below 50%. For best results, I schedule three to four small, ‘shot-sized’ irrigation events per day, aiming for about 20% run-off relative to the total feed solution applied.

    Insights from the IARI Breeding Programme

    A significant part of Pusa Jwala’s reputation stems from its robust pedigree, developed at the Indian Agricultural Research Institute (IARI). The IARI breeding programme used classical techniques such as mass selection and backcrossing to develop cultivars with high yield and strong disease resistance.

    Historical Techniques and Disease Resistance

    If etymology and language is your thing then you’ll be interested to note that the name “Pusa Jwala” literally translates to “Pusa Flame” in Hindi—a reference to its georgraphic origins and its wonderfully addictive heat.

    Diving a little deeper, the word “Jwala” originates from the ancient language of Sanskrit and translates directly to “intense flame”—this appositely reflects the chili’s bright red pigment when the tapered, wrinkled pods are fully mature.

    This cultivar is most commonly grown in regions like Gujarat and Maharashtra, where the climate and cultivation practices have long favoured robust chilli production.

    IARI’s efforts also focused on imparting resistance to several common diseases, including:

    • Phytophthora Root Rot: A fungal threat prevalent in conditions of high moisture, which the genetic resistance helps mitigate even in hydroponic setups.
    • Chilli Leaf Curl (Begomoviruses): A viral disease that has historically impacted yields; the resistant genetics ensure a better chance of maintaining healthy plants.
    • Bacterial Wilt: Another serious concern in traditional cultivation that Pusa Jwala’s pedigree helps overcome.

    For indoor growers, these traits provide reassurance that the robust genetics of Pusa Jwala can offer additional protection even in a controlled environment.

    Green Pusa Jwala chilies
    Green Pusa Jwala chilies

    Comparative Advantages: A Research-Based Perspective

    Research and practical experience suggest that while some cultivars may germinate faster, Pusa Jwala consistently outperforms in key areas relevant to indoor hydroponic systems.

    • Early Flowering and Fruit Set:
      Although its germination may be slower than that of cultivars like Pusa Sadabahar or Bangalore Torpedo, once established, Pusa Jwala is invariably the first to flower. This early generative transition is essential for maximising production in a space-restricted indoor setting.
    • Gradual Build-Up of Heat:
      The heat in Pusa Jwala starts off subtle, allowing for a refined flavour profile during early use. As the fruits mature from dark green to red, the capsaicin levels build gradually—a beneficial trait whether you plan to use the chillies fresh, dry them for powders, or produce high-quality seeds.
    • Compact Growth Habit:
      Unlike some varieties that may become tall and unwieldy under full-spectrum lighting, Pusa Jwala maintains a fairly compact form. This makes it particularly well-suited to indoor hydroponic cultivation, where space and uniformity are critical.

    These attributes, supported by research, highlight why Pusa Jwala is the preferred choice for those seeking a premium, indoor hydroponic chilli cultivation experience.

    Practical Tips for the Indoor Grower

    For those looking to replicate my success with Pusa Jwala, here are some practical tips:

    • Monitor Your Nutrient Solution:
      Use reliable devices such as the Grodan GroSens monitor to track EC, pH, and root zone moisture. Regular adjustments help prevent nutrient overload and salt build-up.
    • Adopt Multiple Irrigation Events:
      Manual irrigation may require three to four small ‘shot-sized’ waterings per day. Aim for about 20% run-off relative to your total feed volume to ensure optimal nutrient uptake.
    • Adjust Nutrient Formula as Needed:
      During the generative phase, lower nitrogen levels while increasing phosphorus and potassium. This strategy manages rising run-off EC and promotes healthy flowering and fruit development.
    • Patience is Essential:
      Understand that while the slow germination of Pusa Jwala may test your patience, the early flowering and robust fruit set ultimately yield superior results. Allow the fruits to mature fully—from dark green to red—to fully develop their flavour and heat.
    • Embrace the IARI Legacy:
      Remember that the strong genetic resistance developed at IARI offers an extra layer of security against common diseases such as Phytophthora root rot, chilli leaf curl, and bacterial wilt.

    Pusa Jwala is a premium chilli cultivar that combines a storied pedigree with exceptional performance in indoor hydroponic systems. Its name—rooted in its origins at IARI in Pusa, with “Jwala” meaning “intense flame”—reflects both its cultural heritage and its gradually developing heat. While it is most commonly grown in Gujarat and Maharashtra, its robust characteristics have made it a favourite among growers worldwide. Living in southern France, where fresh chilies are scarce, I have found that Pusa Jwala offers both an unmatched flavour and reliability under controlled conditions.

    Pusa Jwala has a robust form and plant structure.
    Pusa Jwala has a robust form and plant structure.


    For anyone looking to enhance their indoor hydroponic garden with a chilli that flowers early, maintains a compact growth habit, and gradually builds an ideal heat profile, Pusa Jwala stands out as a definitive choice. With Premium Pusa Jwala seeds available for growers in Europe, France, the UK, and worldwide, you can be confident in cultivating a crop that marries tradition with modern indoor technology.

    Happy growing, and may your indoor garden flourish with the steady, fiery promise of Pusa Jwala!

  • Dalle Khursani: The Himalayan Fireball That Deserves a Place in Your Grow Room

    Dalle Khursani: The Himalayan Fireball That Deserves a Place in Your Grow Room

    A Comprehensive Hydroponic Guide to Cultivating the Iconic Eastern Himalayan Chili

    This story begins with a serendipitous encounter with a new neighbour. Raj, a tranquil soul from Nepal was sat on his terrace, opposite my house, learning French on Duo-Lingo. We struck up a conversation and it quickly became clear that he was missing his homeland; he lamented the near-impossibility of finding his beloved chilli in our sleepy French village. What were the chances? He has moved nextdoor to me! (A complete chilli nut!)

    His tales of fiery pickles, tangy chutneys and delicious dhals made using Dalle Khursani ignited my curiosity. With years of indoor hydroponic experience tucked under my belt, I decided to accept the challenge: to bring the authentic, GI-protected Dalle Khursani to life in my own controlled environment—if, for nothing else, to make Raj feel a bit nearer to home.

    Chill seed germinating.
    Seed germinating and emerging from the stonewool propagation plug.

    What Exactly is Dalle Khursani?

    Origins and Cultural Significance

    Deeply cherished across the highlands of Nepal, Bhutan, Sikkim, and even in select pockets of Darjeeling, this little ruby pepper is affectionately known as the ‘round chilli’—a whimsical nod to its unmistakable, rotund form. Commercial ventures in Sikkim during the late ‘90s heralded its arrival on the market, and since then, it has steadily etched its mark on Himalayan culinary traditions—featured in tangy pickles, robust chutneys, and fiery sauces. Thanks to its prized Geographical Indication (GI) status, only those chillies cultivated in its ancestral lands can rightfully be called Dalle Khursani.

    A Symphony of Heat and Flavour

    The charm of Dalle Khursani lies not only in its impressive kick—ranging from 100,000 to 350,000 Scoville units—but in the artful equilibrium of its flavour profile. As you chew, your mouth is overwhelmed by an immediate, electrifying “zing” that, just as you begin to panic, mercifully mellows into a gentle, almost caressing, far more sophisticated warmth. This unique interplay of sensations makes it a versatile ingredient in the kitchen and a delightful subject for conversation among spice lovers.

    Dalle Khursani depicted in its native habitat, Nepal.
    Dalle Khursani depicted in its native habitat, Nepal.

    Cultivating Dalle Khursani Hydroponically: Technical Insights

    Growing Dalle Khursani indoors demands a meticulous approach. Despite cultivating it so far from its native habitat, I believed that hydroponics and my meticulous approach to replicating environmental conditions, could unlock the true potential of this extraordinary variety.

    1. Seed Germination: Laying the Foundation

    Patience is paramount. Dalle Khursani seeds might take between 7 and 21 days to germinate under optimal conditions. Here’s how I set the stage for success:

    • Growing Medium: I favour Grodan stone wool cubes for their superb moisture retention and natural aeration.
    • Pre-soaking: Before sowing, I immerse the cubes in a delicately balanced, pH-corrected nutrient solution. I use reverse osmosis water enriched with CalMag and trace elements to bring the EC to around 0.1 or 0.2 mS and the pH to about 5.5.
    • Environmental Setup: Keep the air temperature comfortably between 25–30°C (77–86°F) and maintain a high humidity level of roughly 80–90% using a propagator with a humidity dome.
    • Lighting: Provide soft, full-spectrum LED lighting at approximately 150–200 µmol/m²/s PPFD to ensure gentle yet effective illumination.

    2. Transplanting and Early Growth

    Once the seedlings are demanding one or even two dips into feed solution per day, it’s time to transplant them into larger Grodan HUGO 6” grow blocks. I like to wait until they are really screaming out to be transplanted, so they transition seamlessly into their larger stage grow blocks. At this stage, careful adjustment to new conditions is key:

    Tube heaters help to keep daytime and nighttime temperatures sufficiently warm for seed germination.
    Tube heaters help to keep daytime and nighttime temperatures sufficiently warm for seed germination.
    • Lighting Transition: Gradually increase the light intensity. I typically adjust my dimmers on my 2 x 100W Daylight LED bars to push PPFD levels to around 300–400 µmol/m²/s. They’re still only at 50% setting. At 100% they can reach upwards of 700 µmol/m²/s.
    • Temperature Control: Aim for daytime temperatures in the range of 25–28°C (77–82°F), with evenings cooling slightly to around 20–22°C (64–68°F). I’ll let the nighttime temperatures drop a little lower when I want to steer them towards generative production.
    • Humidity Management: Once the protective dome is fully removed (do so as iteratively as possible), I sustain a relative humidity of about 60–70% to ensure your plants remain stress-free. Sometimes, filling a Garland grow tray underneath the seedlings with a little water can help—as it does get quite arid in my region.
    • Nutrient Solution: As soon as I can, I get my seedlings used to a slightly stronger hydroponic nutrient mix with an EC of 1.2 mS. Formulations like Plagron Hydro A+B with added CalMag work brilliantly when paired with zero-mineral RO water. I also use Ecothrive Trace—a micronutrient supplement—when feeding my plants dilute nutrient solutions like this.
    Dalle Khursani in vegetative growth phrase
    Dalle Khursani in vegetative growth phrase, with a few flowers beginning to form.

    For clarity, here’s a quick-reference table outlining the light intensity at different growth stages:

    Growth StagePPFD (µmol/m²/s)Lighting Duration
    Germination150–20016 hours (with 8 hours dark)
    Early Transplantation300–40016 hours (with 8 hours dark)
    Flowering & Fruiting600–80012–13 hours (adjustable)

    3. Flowering and Fruiting: The Real Magic

    This is where the process truly becomes a dance of science and nature. Dalle Khursani is a short-season, high-yield cultivar that thrives under well-controlled conditions:

    • Light Cycle: I find that 16 – 18 hours’ daylength during vegetative growth is great—especially for keeping the grow tent at a nice warm temperature. (Use tube heaters in the dark period.) Then I reduce to 12–13 hours when flowering begins. Chilies aren’t photoperiodic, but the shorter days, coupled with higher light intensity, helps steer them into generative production.
    • Increased Light Intensity: When buds start to form, I go all out for light intensity, boosting the PPFD to between 600–800 µmol/m²/s or higher to encourage abundant fruit set. At this point I remove any lower leaves that aren’t receiving much light to help the plant to focus its energies.
    • Nutrient Adjustments: I raise the EC to 1.8–2.5 mS—reducing the amount of base nutrient and making up the rest by adding a phosphorus and potassium (PK) boost to support fruit development.
    • Climate Considerations: Lower humidity to 50–60% to mitigate fungal risks, and ensure ample airflow using oscillating fans and a 4-inch extraction system.
    • Plant Management: Since these plants can stretch up to 1.5 metres indoors, early topping to promote branching can be a good idea. Staking sometimes becomes necessary once the fruits start accumulating on the branches.
    Dalle Khursani buds.
    Dalle Khursani buds.

    4. Harvesting and Seed Production

    Approximately 90–100 days after transplanting, your Dalle Khursani should be ripe for harvest. Look for these signs:

    • Colour and Texture: The fruits should turn a vibrant red and exhibit a firm texture.
    • Ease of Detachment: Ripe pods will detach effortlessly when twisted.
    • Seed Quality: For seed production, choose only the best fruits from the healthiest plants. The seeds should be creamy-white and well-formed. 

    5. Common Cultivation Problems

    Immature Dalle Khursani chili.
    Immature Dalle Khursani chili.

    Even with optimal conditions, challenges can arise. 

    • Slow Germination: Typically, the propagation medium is not warm enough. Try a heat mat or tube heaters. A small grow tent can make increasing air temperatures much easier (and more energy efficient than trying to heat a whole room.) Keep media moist but not sodden.
    • Nutrient Imbalances: Regular monitoring of EC and pH is essential. Dalle Khursani’s unique capsaicin dynamics mean that slight variations might have noticeable effects.
    • Environmental Stress: Keep a watchful eye for sudden temperature drops or poor ventilation, which can lead to leaf curl or reduced fruit set.

    Why Grow Dalle Khursani Indoors?

    Dalle Khursani isn’t just another chilli—it’s a culinary and horticultural marvel that marries tradition with technology. Its balanced heat, which starts with an electrifying punch and mellows into a gentle, caressing warmth, makes it a standout ingredient in both modern and traditional recipes. For those in the UK and across Europe, where authentic Himalayan chillies are rare treasures, cultivating this GI-protected variety hydroponically offers a unique opportunity to enjoy its fiery brilliance year-round.

    • A Culinary Masterpiece: Its nuanced heat and flavour profile not only enhance dishes but also serve as a fascinating conversation starter.
    • Premium Seed Production: I grow my own Dalle Khursani for culinary purposes, to make my neighbour Raj smile (it’s the most wonderful sight!), and to produce the highest-quality seeds, which I’m now starting to sell in limited quantities!
    • Optimised Hydroponics: With the precision control afforded by hydroponics, every aspect of its growth can be fine-tuned, ensuring a consistently high-quality yield.

    Dalle Khursani epitomises the perfect blend of ancient culinary heritage and cutting-edge growing techniques. Its fascinating history, intricate flavour profile and demanding yet rewarding cultivation requirements make it a true gem for any serious grower. Embrace the challenge, refine your approach, and discover why this Himalayan fireball continues to enchant both culinary aficionados and hydroponic enthusiasts alike.

    For those ready to embark on this fiery journey or interested in acquiring premium “Dalle Khursani” seeds (grown in an optimised and controlled environment in France), do not hesitate to reach out.